How to Build an Internally Lit LED Disco Staff from Everyday Amazon Parts
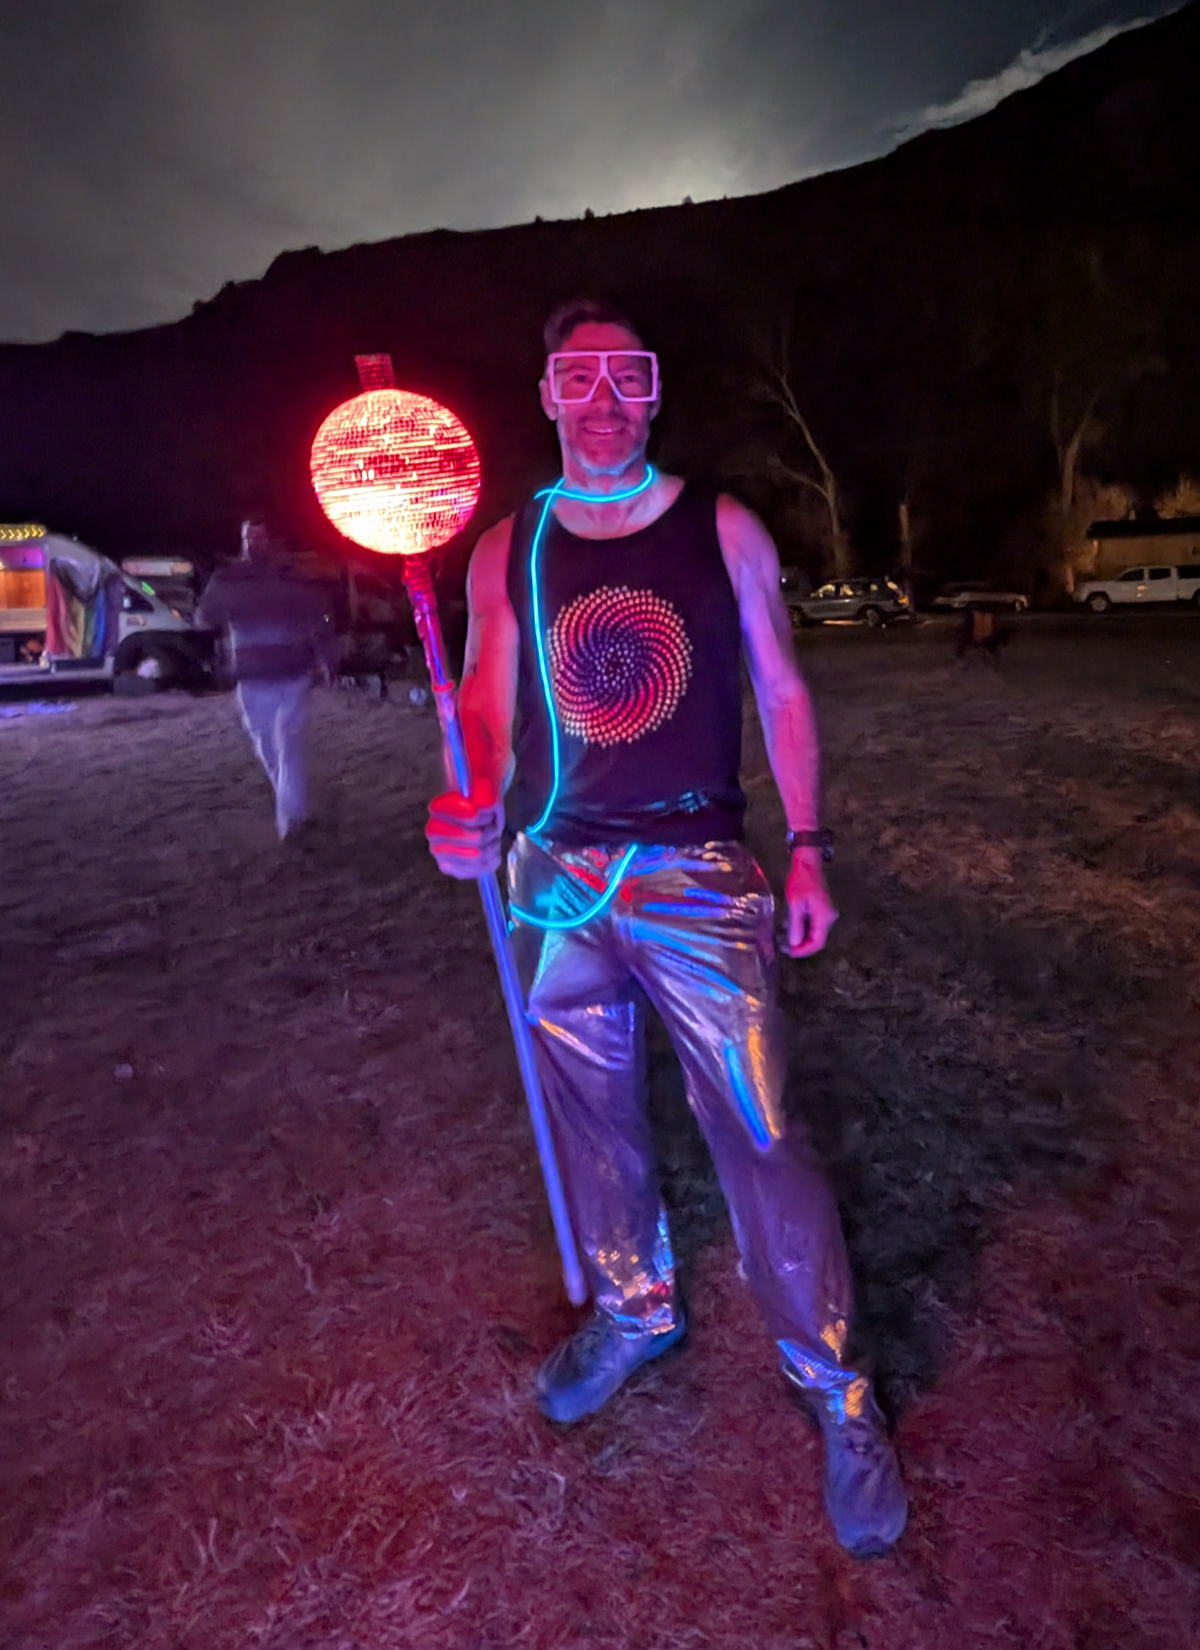
If you’ve ever wanted a festival totem or party staff that stands out at night without requiring a backpack full of heavy batteries or fragile exposed wiring, this DIY light-up disco staff hits the sweet spot.
Normally, a disco ball only works if someone else is shining a spotlight at it. By building around a hollow translucent 6.3-inch claw-machine capsule and mounting magnetic rechargeable LEDs inside the sphere, this staff glows brightly from within through the gaps between the mirror tiles while still bouncing reflections off the glass mosaic. Best of all, the whole shaft is built from an iron curtain rod that unscrews into packable segments.
Here is everything I used and how to put it together.
The Parts List
Disclosure: As an Amazon Associate I earn from qualifying purchases.
All of the core components came straight off Amazon:
-
The Shaft: TONIAL 3/4” Silver Curtain Rod (20” to 53” Telescoping & Splicing Iron Rod) (also available via TONIAL Official). Because it’s made of ferromagnetic iron and uses screw-together segments, it’s sturdy, packable, and naturally magnetic.
-
The Sphere: Big Claw Machine Capsules – 6.3-Inch (160mm) Translucent Plastic Sphere (two-piece snap-together PVC plastic sphere with one translucent yellow half and one clear half).
-
The Lights: Two USB-Rechargeable Magnetic LED Lights (3000mAh RGB/Dimmable Puck Bulbs with Remote).
-
The Mirror Finish: Self-Adhesive Disco Ball Mirror Tiles (real glass mirror mosaic sticker rolls).
-
Finishing Touches:
- Custom-sewn velvet cord sleeve (huge thanks to Jenny for sewing the velvet cover!)
- Duct Tape (for locking the telescoping joint)
Step 1: Prepping the Curtain Rod Shaft
The TONIAL 3/4-inch curtain rod comes with multiple screw-together splicing segments plus a telescoping section. To get the right height and balance for walking and dancing, I used all but one of the rod segments.
Since a telescoping rod will naturally want to slide closed when you tap it on the ground, I set the telescoping section to my preferred height and locked the joint in place with duct tape.
Step 2: Drilling the 6.3-Inch Claw Machine Capsule
The two-piece 6.3-inch plastic capsule has a translucent yellow bottom hemisphere and a clear top hemisphere. To mount it securely onto the curtain rod:
-
Bottom Hole (0.75 in): I drilled a 0.75-inch hole dead-center in the bottom of the yellow half so the 3/4-inch curtain rod slides snugly right inside the sphere.
-
Top Hole (~0.2 in): I drilled a smaller ~0.2-inch hole in the top of the clear half so the top tip of the rod assembly seats cleanly at the top pole of the sphere, keeping the ball centered and wobble-free.
Step 3: Mounting the Magnetic LEDs & Routing Power
Here is where the iron curtain rod really shines. Because the rod passes straight through the center of the 6.3-inch ball and is magnetic, you don’t need hot glue or internal brackets to hold the lights:
-
Simply snap the two USB-rechargeable magnetic LED lights directly onto opposite sides of the curtain rod inside the capsule. Sticking them on opposite sides gives you 360° illumination with no dark spots.
-
Before snapping the ball shut, plug two USB charging cables into the lights and route the cords out through the 0.75-inch bottom hole alongside the rod. That way, you never have to crack open the disco ball to recharge the batteries between nights out.
-
To keep the wiring clean and comfortable to hold, the charging cords run down the upper shaft inside a custom velvet sleeve sewed by my friend Jenny.
Step 4: Tiling the Sphere (Learn from My First Attempt!)
Disco ball mirror tiles come on wide backing sheets with multiple rows stuck together.
-
What Didn’t Work (Attempt #1): At first, I tried sticking the mirror strips onto the 6.3-inch ball straight off the roll in multi-row sheets. Because you’re wrapping a flat grid onto a tight sphere, wide strips bunch up, fight the curvature, and don’t look very nice.
-
What Worked (Attempt #2): For the second try, I broke the sticker sheets apart into a single row of tiles and wound that single row continuously from the bottom of the ball to the top. Had some help from my daughter with this part. Be careful with the squares because they are glass and the edges are a little sharp. No blood was spilled though.
I tried to fill all the space, which naturally leaves plenty of small gaps between the square glass tiles as they wrap around the curved surface. Once you turn the internal LEDs on, those gaps become the best feature of the build: the bright internal light blazes out between the tiles while the glass mirrors catch and reflect light in every direction.
Field Test
Taking it out at night (paired with Spaceman Spiff glasses and an EL-wire outfit), the staff throws a surprising amount of warm light onto the ground and everyone nearby while acting as an easy-to-spot beacon across camp. When it’s time to recharge (they last for at least 6 or so hours), the USB cords are right there under the velvet sleeve, ready to plug into a power bank.
The remote allows changing colors of the lights, which can be fun if you loan out the staff.
Destructive Test
If dropped hard enough the ball can come apart, causing some dishevelment of the mirror tiles. But it didn’t break, and went back together and looked OK and could be repaired before the next party.
Maker References & Further Reading
- Single-Row Spiral Tiling & Internal Lighting:
- Alternative Totem & Mirror Ball Approaches: